为什么要做这个项目
1.练习 vue3+ts,学习一些 css 技巧(布局/动画效果)
2.网页版的宝可梦图鉴很少,大都是app。并且宝可梦图鉴大都很丑,让人没有使用的欲望。
3.其实更想做篮球和足球的数据图鉴,但是没找到免费的开源接口
数据描述
getPokemonApi(id: number)
base_experience:击败这只宝可梦获得的经验
abilities: 能力/被动 为神奇宝贝在战斗或主世界中提供被动效果。神奇宝贝有多种可能的能力,但一次只能有一种能力
forms:种族?暂时没啥用
game_indices: 游戏不同代
height: 身高 dm
held_items:当遭遇到这只宝可梦时,它可能携带的物品
location_area_encounters:可能遭遇的地点
moves:技能
name:名字
order:仅用于排序
past_types:该宝可梦在前几代拥有的类型的详细信息
species:一些图片
status:统计数据(hp attack)。每个神奇宝贝的每个属性都有一个值,随着他们的等级增加而增长,并且可以通过战斗中的效果暂时改变。effort(EV)努力点
types:类别(注意类别克制)https://pokeapi.co/api/v2/type/{id or name}/
weight:体重
遇到的问题
保证请求的顺序
问题描述
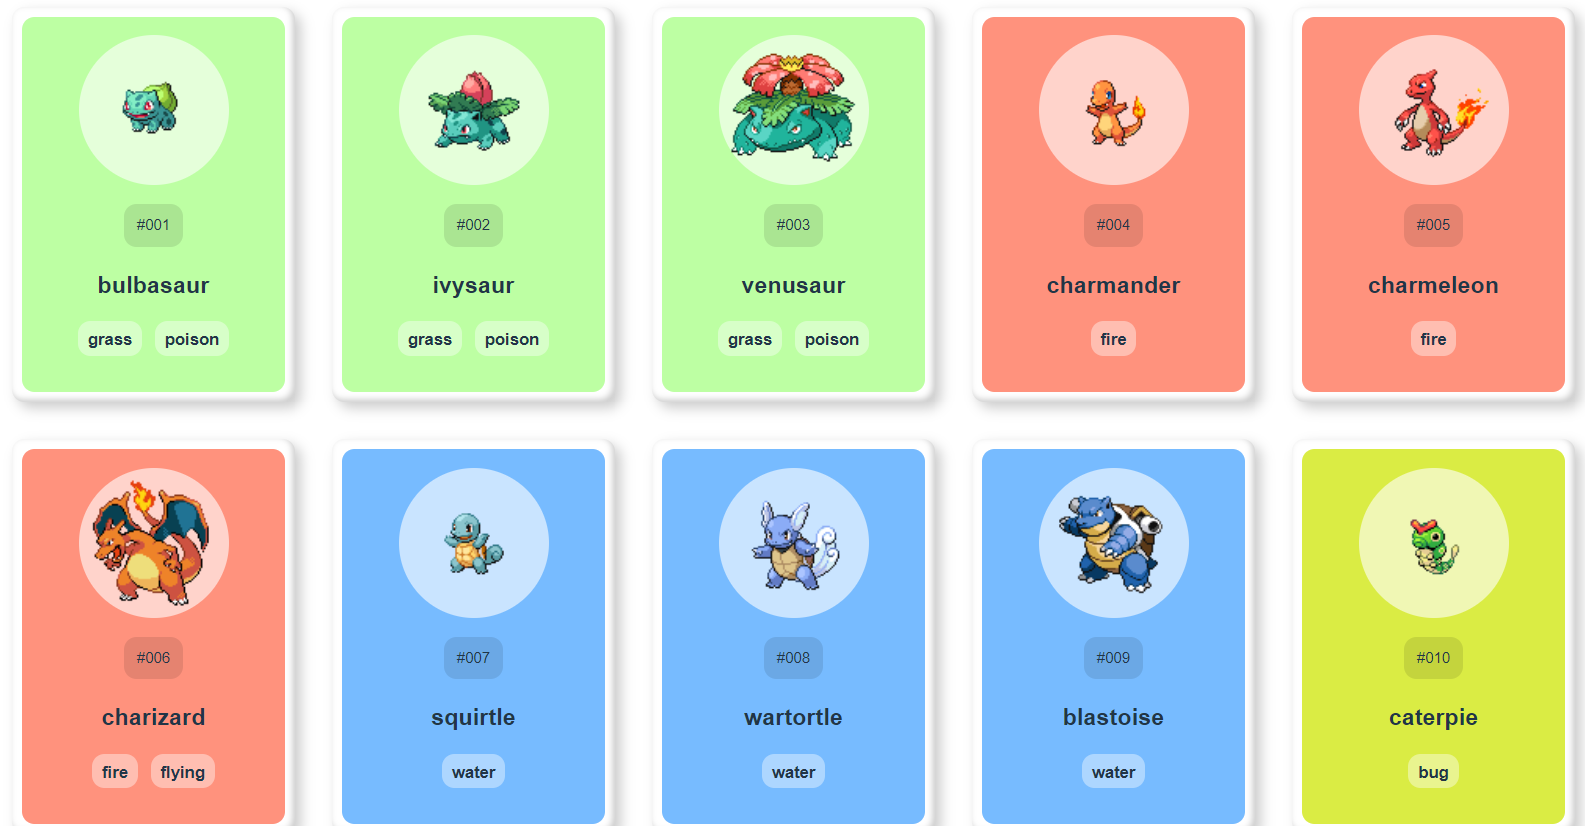
没有获取所有宝可梦数据的请求,一次只能获取一个宝可梦的数据。而我们需要保证获取的顺序。
也就是说,有很多个请求需要依次发送,待上一个请求完成之后再发送下一个请求,发生异常时也要能够继续后面的请求。
如果直接循环发请求,会乱序。
1
2
3
4
5
6
7
8
9
10
11
12
| const getPokemon = (id: number) => {
getPokemonApi(id).then(res => {
const { data } = res
pokemons.push(data)
})
}
onBeforeMount(() => {
for (let i = 1; i < 21; i++) {
getPokemon(i)
}
})
|

1.使用生成器
1
2
3
4
5
6
7
8
9
10
11
12
13
14
15
16
17
18
19
20
21
22
23
24
25
26
|
function* generator() {
for (let i = 1; i < 21; i++) {
yield getPokemonApi(i)
}
}
function run(res: any) {
if (!res.done) {
res.value
.then((response: any) => {
console.log(response)
pokemons.push(response.data)
run(gen.next())
})
.catch((err: any) => {
console.info(err)
run(gen.next())
})
}
}
let gen = generator()
run(gen.next())
|
一个请求完成之后再发送下一个请求,关键在于发送一个之后先停下来等待该请求完成,处理之后再继续下一个请求。生成器generator里面的yield语句可以分割代码,程序遇到yield会停住,通过next语句可以一次执行一个yield分割的语句,本文尝试使用生成器完成依次发送多个请求的功能。
2.await
1
2
3
4
5
6
7
8
9
10
| async function getPokemon() {
for (let i = 1; i < 101; i++) {
await getPokemonApi(i)
.then((response) => {
pokemons.push(response.data)
})
}
}
getPokemon()
|
await会强制其他代码等待,直到后面的promise执行完毕
背景色渐变
1
2
3
| .body {
background-image: linear-gradient(to top, #f3e7e9 0%, #e3eeff 99%, #e3eeff 100%);
}
|
linear-gradient() 函数用于创建一个表示两种或多种颜色线性渐变的图片。
card 模糊效果

1
2
3
4
5
6
7
8
9
10
11
12
13
14
15
16
| h4 {
padding: 5px 10px 5px 10px;
box-shadow: 0 0.3px 0.7px rgba(0, 0, 0, 0.126),
0 0.9px 1.7px rgba(0, 0, 0, 0.179), 0 1.8px 3.5px rgba(0, 0, 0, 0.224),
0 3.7px 7.3px rgba(0, 0, 0, 0.277), 0 10px 20px rgba(0, 0, 0, 0.4);
backdrop-filter: blur(20px);
transition: 0.5s ease;
&:hover {
box-shadow: 0 0.7px 1px rgba(0, 0, 0, 0.157),
0 1.7px 2.6px rgba(0, 0, 0, 0.224), 0 3.5px 5.3px rgba(0, 0, 0, 0.28),
0 7.3px 11px rgba(0, 0, 0, 0.346), 0 20px 30px rgba(0, 0, 0, 0.5);
}
}
|
backdrop-filter 和 filter 的区别:
backdrop-filter 只使背景模糊,不影响内容
filter 会使整部分都模糊
shadow 扩散效果
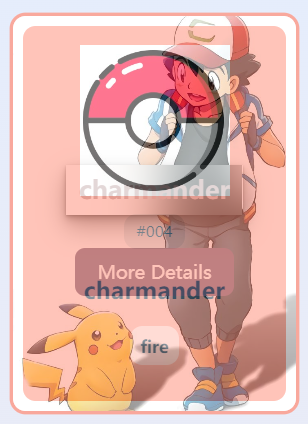
hover/focus 时,触发动画,边框从0向外扩散(红色),到0.7vw为止(透明)。
1
2
3
4
5
6
7
8
9
10
11
| &:hover, &:focus {
animation: pulse 1s;
// x 偏移量 | y 偏移量 | 阴影模糊半径 | 阴影扩散半径 | 阴影颜色
box-shadow: 0 0 0 0.7vw transparent;
}
@keyframes pulse {
0% {
box-shadow: 0 0 0 0 var(--color);
}
}
|
head 动画效果

1
2
3
4
| <div class="head">
<img src="./img/back.gif" alt="">
<h1>Pokemon</h1>
</div>
|
1
2
3
4
5
6
7
8
9
10
11
12
13
14
15
16
17
18
19
20
21
22
23
24
25
26
27
28
29
30
31
32
33
34
35
36
37
38
39
40
| @font-face {
font-family: Biko;
src: url("https://s3-us-west-2.amazonaws.com/s.cdpn.io/4273/biko-black.woff");
}
.head {
position: relative;
height: 100%;
width: 100%;
display: flex;
justify-content: center;
align-items: center;
overflow: hidden;
img,
h1 {
width: 100%;
position: absolute;
top: 0;
left: 0;
height: 100%;
margin: 0;
}
img {
object-fit: cover;
}
h1 {
font-size: 10vw;
font-family: Biko, sans-serif;
font-weight: bold;
text-transform: uppercase;
text-align: center;
background: white;
opacity: 0.7;
mix-blend-mode: screen;
}
}
|
核心是 mix-blend-mode: screen 滤色模式
当使用滤色模式,图层中纯黑部分变成完全透明,纯白部分则完全不透明,其他颜色则根据灰度产生各种级别的不透明
如果不加 opacity 和 mix-blend-mode,则如下所示

加上 mix-blend-mode后,白色遮挡,黑色穿透

再加上 opacity:0.7

card 显示形式
两种形式
不改变 url,点击 more details 弹出 card,点击其它位置关闭
==路由==,点击 more details 直接跳转路由
最后选择路由,因为想将组件拆小,并且逻辑更清晰些
云顶官网也是这样做的
点卡片跳转路由 哈希模式,路由传参 params (传id),显示在路径上
多图绕中心旋转

灵感来源:https://codepen.io/sparshgupta007/pen/gOeypaj
1
2
3
4
5
6
7
8
9
| <div class="info-imgs">
<div class="info-imgs-box">
<template v-for="(value, , index) in pokemonImgs">
<span :style="`--i:${index}`" v-if="typeof value === 'string' && value">
<img :src="value">
</span>
</template>
</div>
</div>
|
1
2
3
4
5
6
7
8
9
10
11
12
13
14
15
16
17
18
19
20
21
22
23
24
25
26
27
28
29
30
31
32
33
34
35
| @keyframes rotate{
from{
transform:perspective(1200px) rotateY(0deg);
}
to{
transform:perspective(1200px) rotateY(360deg);
}
}
&-imgs {
display: flex;
justify-content: center;
align-items: center;
&-box {
position: relative;
width: 10vw;
height: 10vw;
transform-style: preserve-3d;
animation: rotate 20s linear infinite;
span {
position: absolute;
width: 100%;
height: 100%;
transform-style:preserve-3d;
transform:rotateY(calc(var(--i) * 45deg)) translateZ(10vw);
img {
width:100%;
height:100%;
object-fit:cover;
}
}
}
}
|
核心就是利用
transform-style:preserve-3d 和 transform:rotateY(calc(var(–i) * 45deg)) translateZ(10vw) 构造一个三维立方体,可以想象在立方体的前后左右四个面各贴一张图片。
然后 利用动画 rotateY 从 0 到 360 度 让立方体 自转
补充知识:
perspective
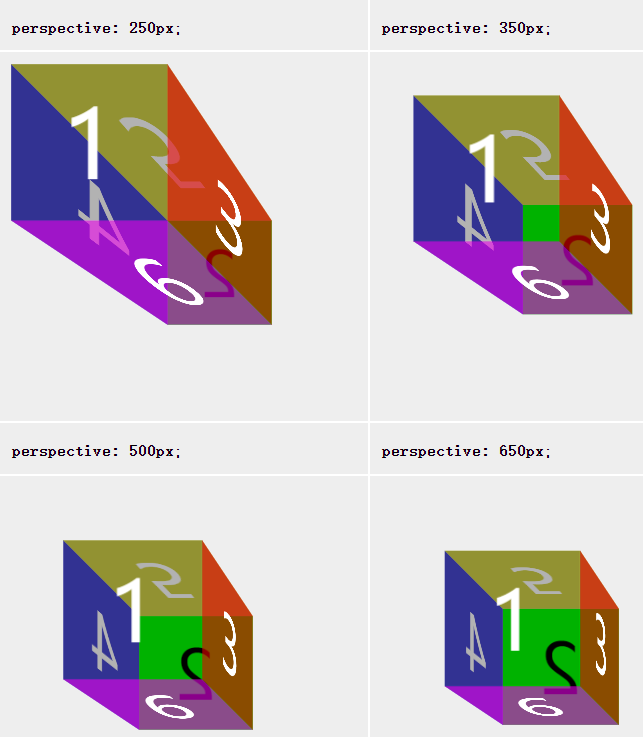
指定了观察者与 z=0 平面的距离,使具有三维位置变换的元素产生透视效果。
perspective 越大,观察者与平面的距离越远,物体越小。
html 向 css 传参
html 中写内联样式 :style=”`–i:${index}`“
css 利用 var 接收 var(–i)
路由不跳转问题
同一页面下,query 参数不同,router.push 后页面不跳转。如下图,点击妙蛙花时,路由不跳转。

原因:vue官网详细解释说明使用同一路由携带不同参数,本质上是重用相同的组件实例,默认在跳转路由时会采用缓存策略,并不会刷新当前路由组件,因此不会调用组件的生命周期挂钩。
解决:监听 router 的动作
1
2
3
4
5
| watch: {
'$route' (to, from) {
this.$router.go(0);
}
},
|
能力图
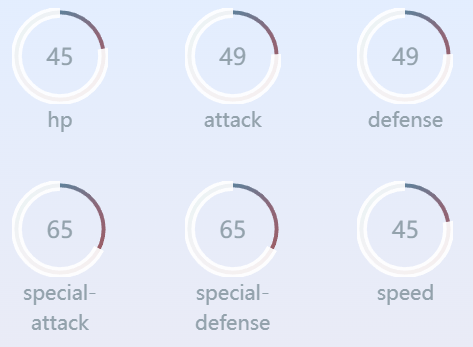
能力值越高,有色部分越多,白圈越少
核心是利用 svg 的 stroke-dashoffset 属性(线偏移量)来控制白圈
1
2
3
4
5
6
7
8
9
10
11
12
13
14
15
16
17
18
19
20
21
22
23
24
25
26
27
28
29
30
31
32
33
34
35
36
37
38
39
40
41
42
43
44
45
46
47
48
49
50
|
<ul class="progress">
<li :data-name="item.stat.name" :data-percent="item.base_stat" v-for="item in curPokemon?.stats">
<svg viewBox="-10 -10 220 220">
<g fill="none" stroke-width="9" transform="translate(100,100)">
<path d="M 0,-100 A 100,100 0 0,1 86.6,-50" stroke="url(#cl1)"/>
<path d="M 86.6,-50 A 100,100 0 0,1 86.6,50" stroke="url(#cl2)"/>
<path d="M 86.6,50 A 100,100 0 0,1 0,100" stroke="url(#cl3)"/>
<path d="M 0,100 A 100,100 0 0,1 -86.6,50" stroke="url(#cl4)"/>
<path d="M -86.6,50 A 100,100 0 0,1 -86.6,-50" stroke="url(#cl5)"/>
<path d="M -86.6,-50 A 100,100 0 0,1 0,-100" stroke="url(#cl6)"/>
</g>
</svg>
<svg viewBox="-10 -10 220 220">
<path d="M200,100 C200,44.771525 155.228475,0 100,0 C44.771525,0 0,44.771525 0,100 C0,155.228475 44.771525,200 100,200 C155.228475,200 200,155.228475 200,100 Z" :stroke-dashoffset="item.base_stat / 200 * 630"></path>
</svg>
</li>
</ul>
<svg width="0" height="0">
<defs>
<linearGradient id="cl1" x1="0" y1="0" x2="1" y2="1">
<stop stop-color="#618099"/>
<stop offset="100%" stop-color="#8e6677"/>
</linearGradient>
<linearGradient id="cl2" x1="0" y1="0" x2="0" y2="1">
<stop stop-color="#8e6677"/>
<stop offset="100%" stop-color="#9b5e67"/>
</linearGradient>
<linearGradient id="cl3" x1="1" y1="0" x2="0" y2="1">
<stop stop-color="#9b5e67"/>
<stop offset="100%" stop-color="#9c787a"/>
</linearGradient>
<linearGradient id="cl4" x1="1" y1="1" x2="0" y2="0">
<stop stop-color="#9c787a"/>
<stop offset="100%" stop-color="#817a94"/>
</linearGradient>
<linearGradient id="cl5" x1="0" y1="1" x2="0" y2="0">
<stop stop-color="#817a94"/>
<stop offset="100%" stop-color="#498a98"/>
</linearGradient>
<linearGradient id="cl6" x1="0" y1="1" x2="1" y2="0">
<stop stop-color="#498a98"/>
<stop offset="100%" stop-color="#618099"/>
</linearGradient>
</defs>
</svg>
|
grid 布局,两行三列
ability 的名字和能力值分别通过伪元素 ::before 和 ::after 的形式插入
1
2
3
4
5
6
7
8
9
10
11
12
13
14
15
16
17
18
19
20
21
22
23
24
25
26
27
28
29
30
31
32
33
34
35
36
37
38
39
40
41
42
43
44
45
46
47
48
49
50
51
52
53
54
55
56
| .progress {
position: relative;
width: 25vw;
display: grid;
grid-template-columns: repeat(3, 1fr);
grid-template-rows: repeat(2, 1fr);
margin: -2vw 0 0 5vw;
text-align: center;
&>li {
display: grid;
grid-template-columns: repeat(1, 1fr);
grid-template-rows: repeat(1, 1fr);
position: relative;
text-align: center;
color: #93A2AC;
font-family: Lato;
font-weight:100;
margin: 2vw;
&::before {
content: attr(data-name);
position: absolute;
width: 100%;
top: 5vw;
font-weight: 400;
}
&::after {
content: attr(data-percent);
position: absolute;
width: 100%;
top: 1.6vw;
left: 0;
font-size: 1.2vw;
font-weight: 400;
text-align: center;
}
}
svg {
width: 5vw;
height: 5vw;
&:nth-child(2) {
position: absolute;
left: 0;
top: 0;
transform: rotate(-90deg);
}
&:nth-child(2) path {
fill: none;
stroke-width: 25;
stroke-dasharray: 629;
stroke: #fff;
opacity:.9;
animation: load 10s;
}
}
}
|
让分页器一直变色
1
2
3
4
5
6
7
8
9
| animation: changeColor 2s linear infinite;
@keyframes changeColor {
from {
filter: hue-rotate(0)
}
to {
filter: hue-rotate(360deg);
}
}
|
利用 animation 动画 和 filter: hue-rotate 属性,hue-rotate 是色调旋转滤镜
关于 hue-rotate 可以看张鑫旭的这篇文章 https://www.zhangxinxu.com/wordpress/2018/11/css-filter-hue-rotate-button/
边框360度转

利用 animation 和 clip-path 以及 filter-hue-rotate。clip-path 用于裁剪路径,可以看我的博客中的一篇文章。
1
2
3
4
5
6
7
8
9
10
11
12
13
14
15
16
17
18
19
20
21
22
23
24
25
26
27
28
| .about-border {
height: 100%;
background-color: transparent;
border: 2px solid;
border-image: linear-gradient(45deg, rgb(184, 159, 218), rgb(15, 48, 194)) 1;
clip-path: inset(0 100% 0 0);
animation: clipPath 5s infinite linear;
}
@keyframes clipPath {
0%{
clip-path: inset(0 0 100% 0);
filter: hue-rotate(0deg);
}
25% {
clip-path: inset(0 100% 0 0);
}
50% {
clip-path: inset(100% 0 0 0);
filter: hue-rotate(360deg);
}
75% {
clip-path: inset(0 0 0 100%);
}
100% {
clip-path: inset(0 0 100% 0);
filter: hue-rotate(0deg);
}
}
|
待做
类似 https://50projects50days.com/#projects
api 等待时,放皮卡丘跑步的 gif
左侧来一个精灵球,hover弹出很多选项
精灵间的对比
background-size: cover 图片大小自适应
vue3 + ts 的路由:
https://blog.csdn.net/m0_63677099/article/details/124259762
types
https://www.yuewen.com/#©right
一个很好的参考
https://codepen.io/tiffachoo/pen/omowyX
暂时做不到的
1.每张卡要有自己的专属图片(最好是炫酷一点的),替代下方统一的图片
开源 api 中没有

2.不同种族的 card 应该有不同的配色方案
没有 ui,十几个种族,自己设计太麻烦
部署到 github 并生成网页
完整流程:
https://blog.csdn.net/m0_46898790/article/details/126105486
一些简单配置
https://blog.csdn.net/shinjie1210/article/details/122473024
1
2
3
4
5
6
7
8
9
10
11
12
13
14
15
16
17
18
19
20
21
22
23
24
25
26
27
28
29
30
31
32
33
34
| import { defineConfig } from 'vite'
import vue from '@vitejs/plugin-vue'
import legacyPlugin from '@vitejs/plugin-legacy'
export default defineConfig({
plugins: [
vue(),
legacyPlugin({
targets: ['chrome 52'],
additionalLegacyPolyfills: ['regenerator-runtime/runtime']
})
],
base: './',
build: {
rollupOptions: {
output: {
chunkFileNames: 'static/js/[name]-[hash].js',
entryFileNames: 'static/js/[name]-[hash].js',
assetFileNames: 'static/[ext]/[name]-[hash].[ext]',
}
},
terserOptions: {
compress: {
drop_console: true,
drop_debugger: true,
},
},
},
})
|
base 不加打包后的网页打不开的,路径会有问题
构建网页
https://blog.csdn.net/mrliucx/article/details/125574957
网页地址
https://akirajy.github.io/pokemonBook/
注:如果既要开源,又要通过 github 部署成网页,可以 main 分支中放源代码,pages 分支中放打包后的文件


